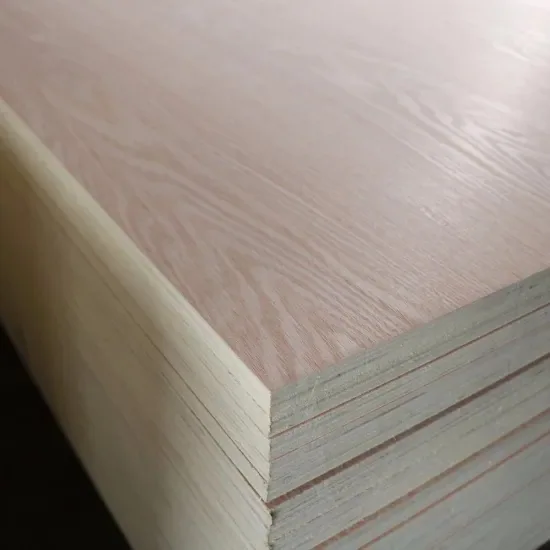
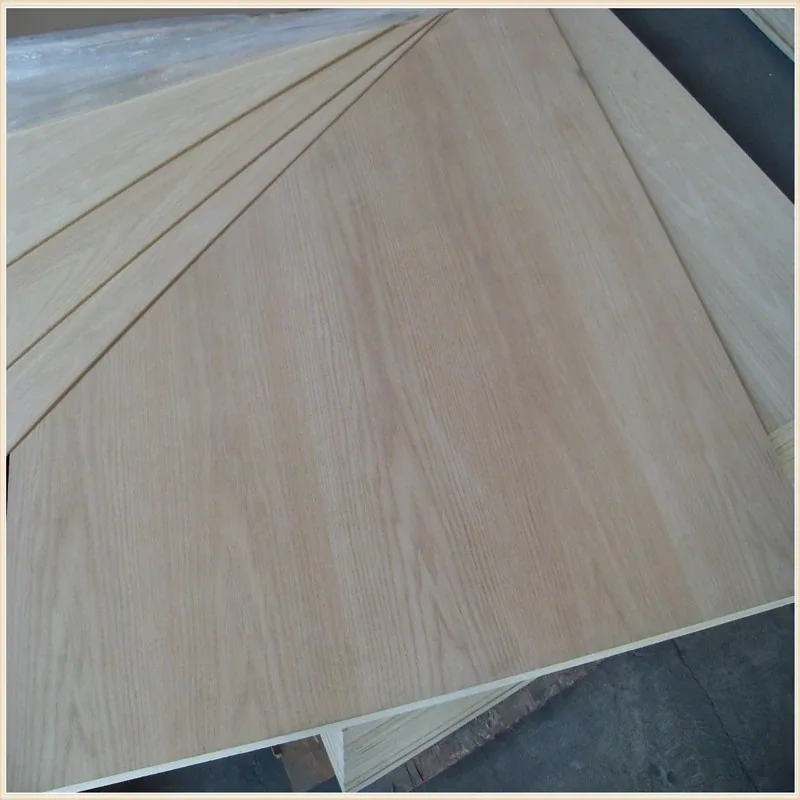
Bring the red oak look through every front, edge and return.
Build a coordinated red oak finish into cabinet doors, furniture fronts and interior joinery. We manufacture veneer-faced plywood in Xuzhou, China and prepare sheets or components around your grain layout, core and finish. Send a design photo or known sizes; our team helps plan face-and-edge samples, machining dimensions and labelled export supply.
Available to order · 10–15 days production · Container shipping
CONSTRUCTION & SUPPLY CONDITION
Red Oak Veneer Plywood specification
Our product configuration and order requirements
Decorative face
Red oak veneer, with selected grain figure, natural tone range and visible features.
Sheet format
4 × 8ft description; actual metric sheet dimensions and custom sizes specified with the quotation.
Nominal thickness descriptions
1/8, 1/4, 1/2 and 3/4 inch; identify the actual production thickness for each line.
Thickness tolerance
±0.5mm reference, applied to the selected thickness and agreed measurement stage.
Squareness reference
±2mm, with its measurement method and acceptance rule recorded separately from length and width.
Core options
Poplar, birch, hardwood or pine; select the combination and layup for the component.
Glue references
Phenolic WBP, melamine or MR; choose the bond requirements for the intended service.
Moisture reference
6–12%, with the supply target, measuring method and fabrication conditions identified.
Density range
520–900kg/m³ across panel configurations; use the selected construction or measured component mass.
Face and reverse
Specify one or two appearance faces, the reverse material and permitted features or repairs.
Veneer preparation
Select the face thickness and sanding condition for the intended decorative finish.
Grain and matching
Identify cut, top direction, adjoining groups, permitted rotations and matched spare parts.
Edge and corner detail
Veneer band, solid red oak lipping or exposed plywood, with the finished joint and retained edge dimensions.
Coating appearance
Choose the tone, pore texture and sheen using the veneer and actual edging together.
Machining dimensions
State the controlling units, datums, finished thickness, receiving grooves and hardware details.
Curved or shaped work
Review radius, direction, core, support and cut-out details using the complete component.
Supplied stage
Raw sheets, prepared components or agreed finished supply, with the operations and drawing revision identified.
Product documents
Identify the destination and emission, fire, sourcing or other evidence required for the selected panel.
Packing and labels
Protected faces and edges, supported bundles, part IDs, matching groups and a clear receiving sequence.
Supply and after-sales
Available to order; 10–15 days production, container shipping, freight terms per order and 180-day after-sales warranty.
Choose the construction, finish and size for your project. We’ll bring the selected options and finished tolerances together in your quotation.
RED OAK FACES, EDGES AND COORDINATED FURNITURE
Bring your red oak furniture and joinery to our factory
Give cabinet fronts, framed inserts and interior joinery a coordinated natural red oak appearance. We manufacture Red Oak Veneer Plywood in Xuzhou, China, selecting the decorative face, core and reverse around the parts your workshop needs.
Start a new furniture or interior project
Send a reference photo, sketch or the dimensions you know. Show the surfaces viewed together and the finish you want. We can help develop the grain, tone, edging and construction before completing the production drawing.
Extend an existing installation
Show the adjoining parts and where the new panel will sit. Compare a finished physical sample beside those surfaces under the intended lighting, then choose the replacement part, pair or visible group.
The range uses the 4 × 8ft sheet format and nominal 1/8, 1/4, 1/2 and 3/4-inch thickness descriptions. We review custom dimensions with your drawings and arrange export supply to the agreed destination. Include quantity, country and timing so the quotation connects the panel specification, sample and delivery scope.
GRAIN, TONE AND THE PARTS VIEWED TOGETHER
Choose the red oak appearance in the finished outline
Red oak veneer faces over a larger sheet area, showing the grain to consider when placing furniture fronts and panels.
Select the natural tone and figure
Choose a light to medium reddish-brown appearance and the natural variation you want across neighbouring fronts, doors or wall panels. Review the veneer under the intended coating, including lighter areas and stronger grain.
For crown-shaped figure, mark its scale and position in the final component. The useful viewing area is the face remaining after trimming, edging, handles and openings.
For broader species and grain choices, see our oak plywood selection page. Keep red oak identified in the brief when coordinating with an existing project.
Appearance background: AHEC — American red oak describes its varied colour and coarse, porous texture.
Turn a red oak reference into an appearance brief
Appearance decision
What to agree
Where to assess it
Light and warm tones
The permitted tone range and whether distinct pale areas can appear in the principal view.
Across neighbouring finished fronts, with the intended coating and light.
Crown or straighter figure
Grain cut, direction, scale and the acceptable position of the figure within the final outline.
On the component layout after trimming, handles and openings are marked.
Natural features and repairs
Which features or repairs may appear on the show face, at the edge or only on the reverse.
On a representative finished sample, including any permitted filled area.
Part-to-part relationship
Adjacent pairs, a continuous sequence or a broader selected appearance group.
In the actual elevation or furniture arrangement, with part IDs and top direction.
Connect veneer matching to the furniture group
Choose book or slip matching within the face, then identify the doors, drawers or wall panels seen together. Mark top direction, permitted rotations and where an appearance group changes. Keep the selected quantity and any matched spares with that group.
Place a centred crown in the finished outline, including material removed by cutting and trimming. For a sequence across adjoining panels, include the installed joint in the visual layout. Our natural veneer matching guide explains leaf arrangement, panel centres and room sequence.
FRONTS, INSERTS AND SHAPED INTERIOR PARTS
Build the panel selection around your furniture detail
Kitchen and wardrobe fronts
Group neighbouring doors and drawer fronts. Identify the reverse visible when opened, edge material, handles and hardware. Review tone and sheen across the finished group, with the actual panel thickness on the machining drawing.
Framed furniture inserts
Show the receiving groove, captured edge and face that controls alignment. Include the coating on both mating parts in the finished fit, and identify whether the reverse remains visible.
Bookcases and furniture carcasses
Mark visible internal faces and front edges receiving lipping. Provide shelf spans, loads, supports and connector details for the design assessment with the selected core and thickness.
Architectural wall panels
Provide the elevation with joints, returns and openings. Keep grain direction and appearance groups on the part schedule, using a full-size arrangement to review prominent figure and the finished tone range.
Interior lattice and shaped parts
Show openings, remaining bridges and attachment points. Choose which cut edges remain exposed or receive covering, then review the cut, corner and coating detail in a finished part.
Curved counters and reception faces
Send the radius, supporting form and lamination plan. Trial the selected construction in its bending direction and compare the coated curve beside the adjoining flat faces.
Include destination-specific emissions, fire, structural or other document requirements with the intended use. We can discuss the panel configuration and applicable documents as part of selection.
COLOUR, PORE TEXTURE AND THE ACTUAL EDGE
Compare the red oak face and edging under your finish
Choose a clear natural look, stained colour or a smoother coated surface. We can discuss raw sheets, prepared components or an agreed finished supply, connecting the included preparation to the work your workshop will complete.
Select texture as well as colour
Choose an open-pore or filled-pore appearance on the selected panel. Trial compatible filler, sealer and coating materials with the specified preparation. Keep sanding within the decorative veneer's agreed allowance.
Put the intended solid red oak lipping or edge band beside the veneer, including the corner and adhesive joint. Decide whether the edge should blend into the face or form a visible border. Record the retained edge build and final component width; for exposed plywood edges, select their appearance with the core.
Compare two finish routes across the selected tone range
Use three selected veneer references, A, B and C, covering lighter, middle and stronger tones. Make a face-and-edge assembly from each under F1 and another under F2, the two finish routes being compared. A clear system and a stain-plus-topcoat system can be selected as those routes.
Six paired assemblies to compare two proposed finish routes
Selected material reference
Finish route F1
Finish route F2
Comparison to retain
A · lighter reference
A-F1: veneer face + intended edging
A-F2: veneer face + intended edging
Face-to-edge tone and the lighter end of the finished range.
B · middle reference
B-F1: veneer face + intended edging
B-F2: veneer face + intended edging
The central appearance reference, texture and sheen.
C · stronger-tone reference
C-F1: veneer face + intended edging
C-F2: veneer face + intended edging
The warmer or more contrasted end of the agreed range.
This requires six assemblies containing six veneer-face pieces and six edging pieces. A–C identify the chosen material range; F1 and F2 identify the finish processes. Keep preparation consistent within each comparison and record the differences between the two routes.
Inspect after the specified drying or curing stage under the intended lighting and viewing direction. Retain the chosen route with the accepted A–C range. Adjust the face, edge or finish together where a different relationship is wanted.
Keep the complete finish reference
Record veneer and edging identities, preparation, colour products, filler or sealer, topcoat, sheen and application method. Include the reverse, cut ends and narrow mouldings where visible. Follow the small comparison with a full-size group to review long joints, crown position and neighbouring faces.
NOMINAL DESCRIPTIONS AND ACTUAL PRODUCTION DIMENSIONS
Set the thickness and units your fittings will use
Our 1/8, 1/4, 1/2 and 3/4-inch descriptions identify nominal thickness choices. Set the actual production centre, tolerance and measurement stage in the quotation, then use those limits for grooves, fittings and machining.
Inch conversions and limits around an agreed production centre
Nominal inch description
Exact conversion
If that exact value is the agreed centre of ±0.5mm
1/8 inch
3.175mm
2.675–3.675mm
1/4 inch
6.350mm
5.850–6.850mm
1/2 inch
12.700mm
12.200–13.200mm
3/4 inch
19.050mm
18.550–19.550mm
The last column applies ±0.5mm only when its exact converted value is the selected centre. A panel ordered at 12.0mm and one ordered at 12.7mm have different dimensional requirements; identify the chosen value on the part drawing.
Exactly 4 × 8 international feet is 1219.2 × 2438.4mm. Confirm the supplied metric dimensions and usable cutting rectangle with the quotation. Our 4 × 8 oak plywood sheet guide develops cutting layouts for its separately specified 1220 × 2440mm format.
Conversion basis: NIST Guide to the SI. One inch is exactly 25.4mm; the order defines the production dimensions and permitted variation.
Specify squareness separately from sheet length and width
The ±2mm squareness reference requires an agreed measurement method and acceptance value. Identify a corner-deviation or diagonal check separately from length and width limits, so the inspection record matches the drawing.
For closely nested parts, record the usable rectangle after edge cleanup. Keep sheet size, squareness, component allowances and kerf together in the cutting plan, with face-grain direction fixed where required.
THE COATED INSERT AND ITS RECEIVING GROOVE
Calculate fit from the finished thickness range
The following joint calculation uses a selected panel of 12.70 ±0.50mm, no further sanding removal, and a 0.10mm dry film on each face. These coating dimensions are inputs for the joint drawing. The wood range is 12.20–13.20mm and the finished thickness is 12.40–13.40mm.
Read the worked detail and calculations
With a receiving groove finishing at 13.00–13.30mm, the tightest combination is 13.00 − 13.40 = −0.40mm, or 0.40mm interference. The loosest is 13.30 − 12.40 = 0.90mm total clearance. Use both ends when choosing the permitted fit and any tighter order limits.
Thin panel against the narrow groove.12.20mm of wood plus 0.20mm total dry film gives 12.40mm, leaving 0.60mm total clearance in the 13.00mm opening.Thick panel against the same groove.13.20mm of wood plus 0.20mm total dry film gives 13.40mm, exceeding the 13.00mm opening by 0.40mm.
The diagrams compare widths at the same scale. Clearance is total across the thickness and divides equally between the two sides only when the panel is centred. Set the joint's adhesive space and movement allowance separately.
Keep a 12.00mm production target as its own configuration
For 12.00 ±0.50mm with the same two 0.10mm films, the finished range is 11.70–12.70mm. In the same 13.00–13.30mm groove, total clearance is 0.30–1.60mm. Choose the actual panel target and coating build together to obtain the required fit.
Include coating inside the receiving groove, root shape and local high points in its final measured opening. A component sample brings the actual panel, coating and joint together before the drawing and production limits are agreed.
THE CORE, TOOL PATH AND COMPLETE COMPONENT
Choose the construction behind the red oak face
Choose poplar, birch, hardwood or pine core around the machining, exposed edges and fittings. Keep the red oak decorative face and reverse identified separately from that core and layup.
Read machining and workshop guidance
Define the machined detail from the controlling face
Send fixing, recess and cut-out drawings with face and edge datums. Review cut edges and fixing regions on the chosen construction, including any areas receiving red oak lipping.
For blind fittings, include deepest tool reach and screw-tip penetration. Calculate the wood remaining behind each operation from the actual panel thickness; coating contributes to the outside dimension. For opposing cuts, include both depths and their positions. The blind-machining explanation on our 16mm oak page develops that calculation for its own dimensions.
Connect handling weight to the selected construction
The 520–900kg/m³ range covers different panel configurations. For a bare component with dimensions 500 × 900 × 12.7mm, volume is 0.005715m³. Applying those endpoints gives 2.97–5.14kg, rounded to two decimals.
This comparison uses the stated dimensions before edging, coatings, fittings or packaging. Use the selected panel's mass and the completed component's weight to finalise hardware, handling and shipment planning.
Choose the bond for the intended environment
Available glue references include phenolic WBP, melamine and MR. Specify the required bond performance with the use and document requirements. The glue choice is separate from the decorative red oak surface and the complete panel's project specification.
Set the fabrication condition
The supply moisture range is 6–12%. Agree its target and measurement method around the workshop and destination conditions, then check the material before machining and coating.
Trial shaped work as a complete part
For curved reception fronts, review radius, bending direction, support and bonding with the actual face and reverse. For lattice openings, identify narrow bridges, cut ends and fixing positions. A prepared and coated part sample helps select the core continuity, edge finish and assembly detail.
A SAMPLE THAT RESOLVES THE NEXT PRODUCTION DECISION
Compare the face, edging and joint as one component
Tell us what you want the sample to resolve: the tone beside existing furniture, the face-to-edge finish, a coated insert in its frame, or a machined fixing detail. A project photo, sketch or known sizes is enough to start.
Appearance and edging
Request the selected tone and grain range with the actual lip or band and proposed finish. Include a crown position, corner or cut end where it controls the visible result. Use the A–C and F1/F2 plan above where comparing two finish routes.
Fit and machining
Include the receiving groove, hardware or shaped opening with its controlling face and finished dimensions. Specify the core, reverse, thickness target and supplied preparation for the trial.
Retain the approved component, finish record and drawing revision with the order. For paired fronts or wall panels, add the visible-group layout so the same reference follows the material through cutting, coating and packing.
Check the selected red oak configuration at each supply stage
Link the panel or bundle identity to its selected appearance range, sample and drawing revision. Review the raw material, machining and coating against the reference for that stage.
Inspection points for the selected red oak panel and finished trial
Inspection stage
What to inspect
Reference to retain
Raw face selection
Tone range, grain, natural features, permitted repairs and the areas assigned to visible parts.
Material identity, group IDs and the accepted range samples.
Dimensions and squareness
Actual thickness, sheet dimensions and squareness using the agreed methods and locations.
Metric or inch limits, measurement stage and the component drawing revision.
Core and reverse
Representative cut edges, fixing regions and the reverse areas that will be visible.
The selected core, face/reverse description and machined detail sample.
Face-and-edge finish
Tone relationship, pore texture, sheen, glue-line appearance and accepted repairs after coating.
The chosen finish route and its accepted A–C material range.
Finished fit
The actual coated panel at grooves, rebates, edge joints and hardware positions.
Measured extremes and a representative assembled component.
Packing and receipt
Face protection, supported packs, edge condition, quantities and group labels.
Bundle identification, packing list and arrival photographs where relevant.
Keep the reference with the parts
Store panels flat on suitable supports in protected conditions, with clean contact surfaces. Carry face, top-direction and group labels into the cut components and retain the approved sample with the workshop record.
For any issue, record the affected panel, location and processing stage. A group photograph, close detail and relevant dimensional or coating record help the factory and receiving team agree the next action.
SELECTED MATERIAL, PREPARED PARTS AND EXPORT DELIVERY
Price the panels at the stage your workshop needs
Separate full sheets and cut components by actual thickness, core, reverse and face selection. Compare quotations at the same supplied stage, including the required selection, machining, edge work, finish, documents and packing.
Information that connects a red oak selection to the supply order
Order item
Information to send
What we define in the quotation
Panel configuration
Red oak reference, core, reverse, required bond and document requirements.
The selected material combination and the evidence applicable to it.
Dimensions and quantity
Actual required units, thickness limits, sheet or part sizes, quantity and drawing revision.
The supply dimensions and scope, with custom processing identified.
Appearance and samples
Finished reference, matching groups, edging and the sample trial you need.
Sample scope, accepted references and the relationship to the order.
Packing and destination
Country, port or address, handling constraints, labels and requested delivery window.
Packing, delivery scope and timing for the agreed supply arrangement.
Coordinate the sample and production schedule
Tell us when the material is needed at your workshop. We review sample preparation, production, inspection, packing and transport with the order, confirming dispatch timing and delivery scope in the quotation.
Make the packing list useful during assembly
For components, include part ID, show face, top direction, appearance group and drawing revision. For full sheets, keep core and thickness lines identifiable. Include matched spares with the initial selection and retain the reference for repeat supply.
Plan face protection, supported bundles and labels around the selected finish and shipment. Share unloading constraints so bundle dimensions and mass suit the receiving arrangement.
PLAN YOUR PANEL ORDER
A red oak finish that follows the whole furniture set.
Bring fronts, returns and edges into one appearance brief. Our factory connects the selected veneer and core to finished samples, actual machining dimensions and labelled supply, so purchasing and the workshop work from the same material references.
Red Oak Veneer Plywood
Your red oak face, core and finished component
Project photo, red oak reference and adjoining surfaces
Actual sheet or part sizes, core, quantity and supplied stage
Edges, finish, samples, matching groups and destination
Start with the face and edge you want to see together. Add the coating, visible reverse and any joint or fitting that controls assembly. Keep the selected appearance range and dimensions with the sample and component drawing.
Standard samples without special work or a logo have no sample charge; delivery is separate. Custom samples are agreed individually.
Order quantity
Our starting guidance is one container for standard sizes and 3,000–10,000 pieces for custom sizes or designs. Tell us your trial quantity.
Production
All products are made to customer order. Production takes 10–15 days; the order confirmation records the start date and production schedule. Sea transit is additional.
Payment
Where a deposit applies, our standard reference is 30% before production, with the balance after inspection and before loading. T/T or L/C terms are agreed for the order.
Shipping
Panel orders ship by container. Share your destination so we can arrange the loading plan and quote the freight separately from production.
After-sales warranty
All products include a 180-day after-sales warranty. Contact our team with the order reference and details of any product concern.
Tell us your quantity, sample needs and target delivery date. We’ll put the price, payment terms and production schedule into your quotation.
Share the material, thickness and test standard your project requires. Our factory team will help you select the product reports and documents for your purchase.
Production & inspection
We can plan production and inspection around your panel specification, with dimensional checks, recorded readings and packing photographs for your order.
We prepare packing details, pack quantities and dispatch documents for your order. Share the destination and receiving requirements so our team can help plan delivery.
It combines a decorative red oak face with a selected plywood core. Choose poplar, birch, hardwood or pine for the inner construction, then specify the visible reverse, bond, edge and machining needs for the furniture or joinery.
Where do you manufacture, and can you supply my destination?
We manufacture in Xuzhou, China and arrange export supply. Send your country, port or delivery address with the quantity and required timing. Our team will develop the sample, packing and delivery scope for your quotation.
How do I choose the red oak colour and grain?
Start with a photo or finished reference and the appearance you want across adjoining parts. We help select the natural tone range, figure scale and visible features, then compare the veneer under your intended stain or clear finish.
How do I coordinate book-matched faces with adjacent doors?
Choose the leaf arrangement within each face, then mark the relationship between doors, drawers and side returns on the final layout. Include top direction, permitted rotations, trim and joints so the selected sequence follows the finished components.
Can I coordinate new panels with an existing red oak cabinet?
Yes. Begin with photographs of the existing work and the adjoining surfaces. A physical finished reference helps compare the proposed veneer, edging and coating under the intended lighting; retain the selected range for the new components.
What should a face-and-edge sample include?
Use the actual veneer, edge band or solid red oak lipping, adhesive joint and corner with the intended finish. Decide whether the edge should blend with the face or form a visible border, and include any reverse seen when a door opens.
How many assemblies are needed for the two-route finish comparison?
The plan uses three selected material references, A, B and C, each prepared with finish routes F1 and F2. That gives six assemblies containing six veneer-face pieces and six edging pieces. Retain the chosen route across the selected material range.
Can I choose both the stain colour and the pore appearance?
Yes. Specify the desired tone, open-pore or filled-pore texture and sheen. Compare a compatible preparation and coating system on the selected face and edging, following the finish supplier’s process and retaining the accepted finished reference.
Which thickness should I specify for a half-inch description?
Write the actual production target with its units and tolerance. Half an inch converts exactly to 12.7mm; 12.0 ±0.5mm and 12.7 ±0.5mm describe different panel orders. Use the chosen target when setting grooves, fittings and machining dimensions.
How does coating affect a receiving groove?
A fit check using 12.70 ±0.50mm wood, no further sanding and a 0.10mm dry film on each face gives a finished thickness of 12.40–13.40mm. A finished groove of 13.00–13.30mm gives extremes of 0.40mm interference and 0.90mm total clearance. Put the actual panel, finish and joint limits into the drawing before production.
How should the ±2mm squareness reference appear on an order?
Record the agreed squareness method and acceptance value, with length and width limits on their own lines. Keep the usable rectangle, edge cleanup and cutting kerf with the component layout when planning nested parts.
How do I estimate component weight?
For a bare 500 × 900 × 12.7mm component, volume is 0.005715m³. Applying the 520–900kg/m³ panel-configuration range gives 2.97–5.14kg. Use the selected core or measured component mass, adding edging, coating and fittings for hardware and handling decisions.
What does the melamine glue option mean?
It identifies a bonding option within the plywood construction. The decorative face on this page remains red oak veneer. Include the intended exposure and required bond documents when selecting phenolic WBP, melamine or MR with the core.
Can you prepare curved fronts or decorative cut-out parts?
Send the radius, bending direction, supports and complete assembly, or the cut-out drawing with narrow bridges and fixing positions. We can plan a machined and finished component trial around the selected plywood construction.
Which emissions, fire or sourcing documents can I request?
Send the exact document requirement and destination with the proposed core, face and bond. We connect the applicable product records to the selected supply configuration and include the documentation scope with your quotation.
Can I order prepared components instead of full sheets?
Yes. Share the part schedule, drawing revision, datums, supplied finish and the operations you want completed. Identify show faces, top direction, matching groups and spare parts so cutting, machining and protected packing follow the same schedule.
What should I send for a red oak plywood quotation?
Start with a project photo, finish reference or known sizes. Add quantities and destination; we help develop the face, core, actual dimensions, edging, samples and delivery scope. A part schedule or elevation can be added as the selection develops.
What are the production, shipping and after-sales arrangements?
Panels are available to order with 10–15 days production and container shipping. Freight terms follow the specific order. We provide a 180-day after-sales warranty; contact our team with the order and issue details to arrange the agreed handling or replacement.
Show us the red oak furniture or interior you want to make.
A photo, finish reference or known sizes is enough to begin. Share your quantity and destination; we help develop the face, edging, core and supplied work, then prepare samples and a factory quotation.
Decorative face: Red oak veneer, with selected grain figure, natural tone range and visible features.
Sheet format: 4 × 8ft description; actual metric sheet dimensions and custom sizes specified with the quotation.
Nominal thickness descriptions: 1/8, 1/4, 1/2 and 3/4 inch; identify the actual production thickness for each line.
Have a furniture elevation, finished reference or part schedule? Email it to sales@plywoodsupplier.cn. Start with the details you have; we’ll help you work through the rest.
CONTINUE YOUR PANEL SELECTION
Oak veneer and component design
Compare our panels
Browse the material range and compare the configurations for your order.
Optional Google Analytics and Ads cookies measure visits and enquiries. Reject keeps these cookies off; basic cookieless measurement continues. Enquiry details are never sent to Google. Privacy details.