Choose the birch grade that makes sense for your finished furniture.
Start with what the customer will see: a clear-finished front, painted surface, open shelf or layered edge. Compare face and back grades, then work with our factory to choose the core, finish sample and preparation for your order.
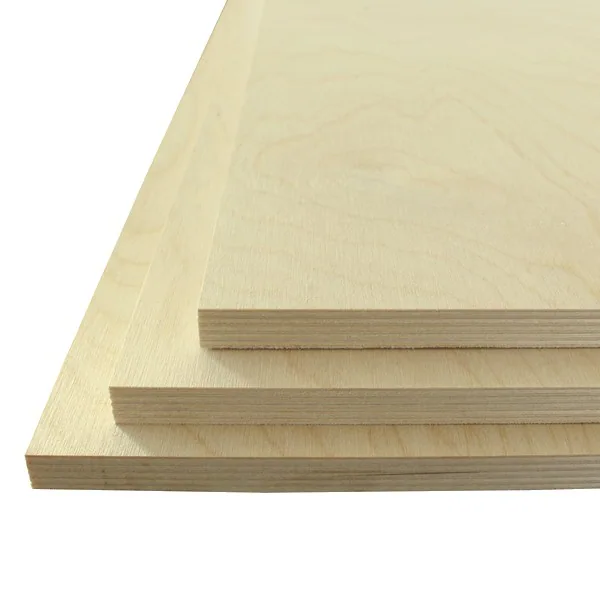
Birch plywood showing pale faces and layered cut edges
CHOOSE THE FACE AND BACK
Read the grade around the surfaces your customer will see.
A birch plywood grade pair describes the appearance required on the face and reverse. In B/BB, the first designation applies to the face and the second to the back. Start with those visible surfaces, then build the core, dimensions, bond and finishing requirements around the component you are making.
Use the grade pair together with its named grading specification, edition and agreed appearance range. This gives buyer and factory a common reference for repairs, knots, colour variation, veneer joints and preparation. If your drawing uses a different system, send that reference so we can compare the actual requirements and propose the appropriate panel.
Scroll sideways to compare all columns.
Common grade descriptions in our range
Description
What to discuss
Where the distinction matters
B/BB
The face appearance and the repairs or variation accepted on the reverse.
Visible furniture faces with a less demanding back.
BB/BB
Repairs, knots, colour variation and sanding condition on both sides.
Components with two visible or worked faces.
BB/CP and CP/CP
The appearance range and repair limits under the agreed grading rules.
Painted, covered or less appearance-sensitive parts, selected with the intended finish.
CP/C and C/C
Permitted open features, repairs and the preparation to be supplied.
Utility or further-processed parts with a construction suited to the use.
START WITH THE FINISHED PART
Choose a grade route for your furniture or joinery.
Tell us the result you want before working through every detail. A furniture photo, finish reference or part list helps us compare suitable face/back pairs and the work your workshop will receive.
Clear-coated or stained fronts
Begin with a B/BB face selection, or compare a selected BB face when its repairs and natural variation suit the design. Review the veneer under the actual clear coat or stain: colour, patches and adjoining faces all contribute to the finished look.
Painted furniture
Compare BB/CP or CP/CP around the required surface preparation. Agree filling, sanding and the condition needed for your primer and topcoat. Include repairs and veneer joints in the finish trial so you can compare the delivered preparation and finishing work together.
Two visible faces
Use BB/BB as a starting point for room dividers, open furniture or doors seen from both sides. Show which areas remain visible and whether both sides need the same colour range, repairs and finish. Identify each face on the component drawing.
Cabinet backs and covered parts
A BB/CP pairing can put the selected face toward the visible cabinet interior. CP/CP, CP/C or C/C may suit concealed, covered or utility parts. Select the surface condition around covering, bonding and machining, with the required back grade stated on the order.
Exposed plywood layers
Choose the face grade alongside the core and edge appearance. For a visible layered edge, compare the cut or routed section with its intended finish. Request all-birch construction when the design calls for birch throughout, or select a birch face on an agreed alternative core.
For a mixed furniture order, give each component its own face/back requirement. A prominent front, visible interior and concealed back can share an order while using different surface selections and thicknesses.
APPEARANCE AND SERVICE CONDITIONS
Specify the surface and bond for the same application.
The surface grade defines what the buyer accepts visually; the bond requirement addresses the plywood's intended service conditions. Include both in the enquiry, together with the destination and any product documents required for the project.
Compare the appearance your workshop will deliver.
Face and reverse
Mark the outward face and the visible reverse. Select the colour range and permitted repairs, pin knots, splits and veneer joints under the named grading rules. Keep the accepted features with the sample reference.
Preparation and coating
State whether the panel will be clear-coated, stained, painted or covered. Apply the intended preparation and finish to the proposed surface, including its accepted repairs. Agree whether that preparation is supplied by the factory or completed in your workshop.
Neighbouring components
Compare the fronts or panels viewed together, including their grain direction, edges and reverse where visible. Review the group under the intended light and retain the accepted range for production.
Photos are useful for starting the discussion. A labelled physical reference carries the selected material, finish and appearance decision into the order. Include a cut component when a profile, edge or visible zone determines the result.
FROM SHEET GRADE TO THE FINISHED PART
Put the appearance requirement where the customer will see it.
Mark the face, reverse and exposed edges on your part drawing. Show the final outline after trimming, the parts viewed together and the areas covered by fittings or assembly. This turns a sheet-grade request into a practical selection and cutting brief.
A cabinet side can have a prominent outer face and a different interior requirement. An open shelf exposes the top, underside and front edge. A drawer front may need its best appearance around the handle and neighbouring fronts. Share these priorities so we can plan the face selection around the finished furniture.
Scroll sideways to compare all columns.
Visible zones to mark on the component drawing
Visible area
Information to mark
Reference to review
Clear-finished face
The outward face and final part boundary, including the position of permitted repairs.
The chosen colour and grain range with the actual clear finish or stain.
Painted or concealed face
The areas painted, covered or hidden after assembly, and the required supplied preparation.
A prepared and coated area showing how permitted features sit under the intended finish.
Front or profiled edge
The layers left exposed, profile shape and locations of joints or fixings.
The actual machined edge, coating and agreed edge-repair appearance.
Adjacent components
Part IDs, top direction and surfaces viewed together in the furniture or elevation.
A group viewed together under the planned finish and lighting.
Compare the usable part, preparation and supplied stage
For a covered back, a less appearance-demanding grade may suit the work. For a clear-finished door, more face selection can reduce the sorting and preparation needed in your workshop. Compare the quoted sheet or component with the same thickness, core, bond, dimensions and supplied stage.
Include cutting margins, rejected visible positions, repairs and finishing work in the purchase decision. For adjacent fronts, keep the selected group together; for hidden parts, use the construction and surface preparation the assembly needs. We can review a marked layout and quote full sheets or prepared parts.
CONNECT APPEARANCE TO CONSTRUCTION
Choose the plywood behind the birch face.
Specify whether you want birch faces on an agreed core or an all-birch panel. Select the layup, thickness and finished dimensions for the part, including the edge condition and machining requirements. Keep those construction details alongside the face/back grade so the quotation describes the whole panel.
For shelves, furniture joints or load-bearing components, share the support arrangement, span, load and relevant product requirements. This lets the factory discuss the selected panel information and documents needed for the intended use. Include bonding, emission or sourcing requirements with the destination.
Our birch plywood products provide routes to individual thicknesses and constructions. The quality guide connects those choices with the order specification, supplied stage and receiving checks.
FACE, EDGE AND FINISH TOGETHER
Review a sample that shows how your birch part will look.
Use the proposed face/back pairing and core in the sample. Keep an identified reference in the supplied condition, then prepare a second area or piece with your intended finish. Include permitted repairs and natural variation so the decision covers the appearance you will receive.
Coated face and reverse
Compare the selected veneer under the actual stain, clear coat or paint system. Record surface preparation, colour and sheen, including a reverse seen when the furniture opens.
Machined edge and fit
Use the intended profile, cut or joint on the selected thickness and core. Check layer appearance, any permitted edge repair and the dimensions controlling assembly.
Adjacent furniture parts
Place neighbouring pieces in their intended direction and viewing conditions. Keep the selected tone range, repair appearance and group labels with the sample decision.
Retain the reference your workshop will use
Record the sample ID, grading reference, face/back labels, construction and drawing revision. State whether the factory supplies sanded sheets, cut blanks or further-prepared components. This connects the accepted finish to the work still required after delivery.
For repeat orders, keep the accepted appearance range and processing record. When the coating, edge profile or visible layout changes, update the affected sample. Our sample and order guidance helps plan the material and finished-component review.
FROM SELECTED GRADE TO FACTORY SUPPLY
Carry the approved appearance into the order and delivery.
List the face and reverse grade, named grading reference, core, bond, dimensions and quantity on each order line. Attach the approved appearance range, visible-zone drawing and supplied preparation. Include the sample scope, minimum order quantity and delivery needs when requesting the quotation.
Link product documents to the chosen construction
Send the destination and required records with the panel selection. Keep applicable product reports tied to the face, core, bond and thickness they cover, with the agreed documentation scope in the order specification.
Make the receiving check easy to follow
Agree the inspection and pack references, quantities to inspect and appearance and dimension checks before dispatch. Keep face/back labels, component groups, drawing revision and protective packing linked to the same schedule. Compare delivered material with the retained reference and record the pack and affected area if any issue needs review.
Panels are available to order, with 10–15 days production and container shipping. Freight terms follow the specific order. Our 180-day after-sales warranty supports agreed handling or replacement when an issue is reported.
PRACTICAL GRADE QUESTIONS
Choose, sample and order the right birch surface.
What does B/BB mean?
It identifies the face and reverse appearance requirements, in that order. Use the pair with the named grading rules and accepted appearance range, then specify the core, dimensions and bond for the component.
Which birch grade should I choose for a clear finish?
Start by comparing B/BB and a suitable BB face against your intended look. Review colour, grain and accepted repairs under the actual finish, including neighbouring components and their visible edges.
Can BB/BB include repairs?
The agreed grading rules define the permitted features. Ask to see the accepted repair appearance on both sides and include it in the finished reference, particularly when either surface remains visible.
How do I compare BB/CP with CP/CP for painted parts?
Compare the delivered surface preparation and the appearance needed on each side. Trial the filling, sanding, primer and topcoat together, then select the pairing and supplied preparation that suit your finished component.
Where can CP/C or C/C be useful?
Consider them for covered, concealed or utility parts where the permitted surface features fit the process. Agree any filling or preparation, plus the construction and bond needed for the intended use.
Which pairing works for two visible sides?
BB/BB provides a practical starting point. Define the visible zones and finish on each side, then agree the colour range, permitted repairs and surface preparation for both.
Does a birch face grade also specify an all-birch core?
The construction is selected separately. Request all-birch when required, or state the agreed core beneath the birch faces. Include the exposed-edge appearance and machining detail in the sample request.
How do I request a grade used in another specification?
Send the named specification, edition and required class. We compare its appearance criteria with the offered construction and grade, then identify the agreed requirement and sample reference on the quotation.
How should I specify birch plywood for humid conditions?
Describe the environment, assembly and protective finish. Select the bond and complete construction for that use, while retaining the face/back grade needed for the visible surfaces and any required product records.
Can you keep repairs away from a prominent part?
Mark that visible zone and the finished cutting boundary. We can discuss face selection and component placement, then include the agreed appearance and cutting scope in the quotation.
What should accompany a grade and finish sample?
Identify the face/back pair, grading reference, core, thickness and supplied condition. Add the intended coating, visible edge and neighbouring parts, with the sample quantity, destination and date you need it.
How can I compare quotations fairly?
Compare the same face/back criteria, construction, dimensions and supplied processing stage. Include samples, machining, inspection, quantities, packing and delivery scope so each quotation covers the components and preparation you need.
WORK DIRECTLY WITH OUR FACTORY
Tell us what you want to make with birch plywood.
A photo, sketch or known dimensions is enough to begin. Add your quantity and destination; we will help select the grade, construction and supplied work, then prepare samples and a factory quotation.
Furniture or interior use and preferred face/back appearance
Core, bond, thickness and sheet or component sizes
Finish, visible edges and supplied preparation
Quantity, destination and required product documents
Email drawings, photographs or references to sales@plywoodsupplier.cn. Include your company name so we can connect attachments with your enquiry.
For an order in progress, include the order reference and the information you need us to review.
CONTINUE YOUR PANEL SELECTION
Birch plywood grades and construction
Compare our panels
Browse the material range and compare the configurations for your order.
Optional Google Analytics and Ads cookies measure visits and enquiries. Reject keeps these cookies off; basic cookieless measurement continues. Enquiry details are never sent to Google. Privacy details.