
Good veneer plywood starts with an agreed look and a sample that shows how the panel will be finished. Send a furniture photo, grain reference or the colour range you prefer; we help select the face, matching and edge detail. Our factory manufactures plywood and MDF substrates and decorative facings, connecting those choices with the finished part. At inspection, compare the panel with that reference and distinguish natural figure from open seams, lifting veneer or finish defects.
Decorative plywood faces Veneered MDF Choose a complete panel sample
Check the face and the layers beneath it
A decorative panel combines a wood face, adhesive, substrate, reverse construction and sometimes a coating. A problem visible at the surface can originate in more than one layer. Record whether the sheet is unfinished, factory-finished or already coated by the fabricator. Identify the face species or engineered design and the agreed appearance grade. Keep this record with the sample so a photograph can be assessed against the intended wood character, finish and construction.
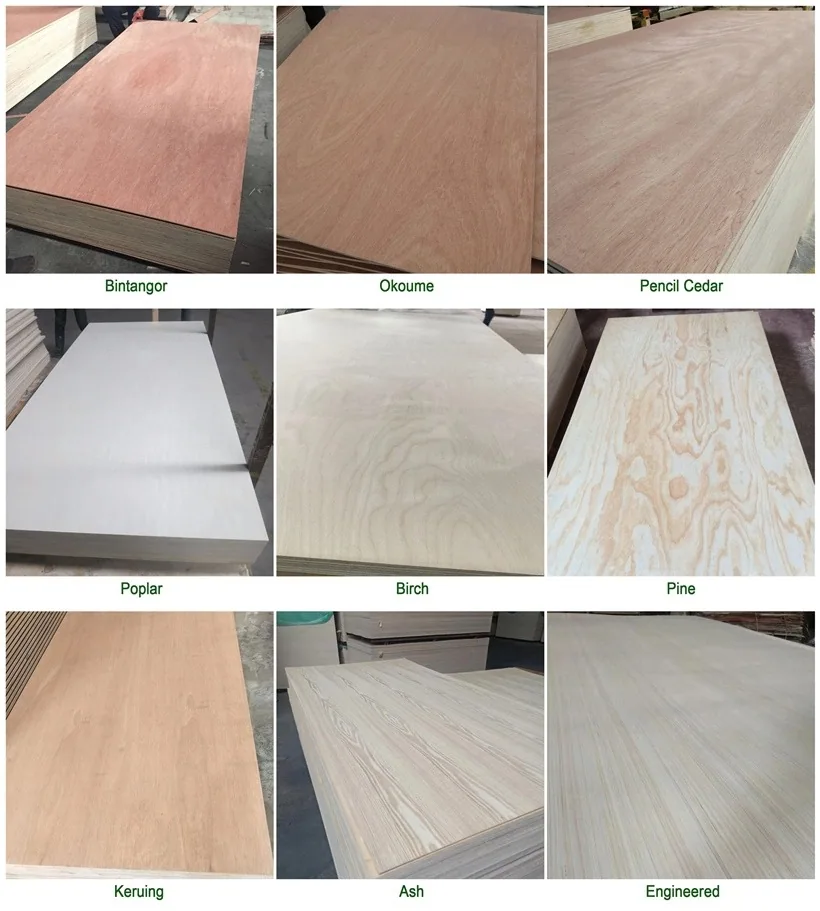
Choose the natural wood character you want
Colour variation, pores, ray figure, knots and mineral marks may be permitted or restricted depending on the selected face. Record the acceptable range using representative samples. An agreed character face should not later be judged against an unstated clear-face requirement. Conversely, natural variation does not explain every physical opening or raised area.
ISO 2426-2 separates wood characteristics and manufacturing defects when classifying hardwood plywood appearance; it excludes overlaid panels. Use the applicable product specification for the supplied surface. Keep the grading basis and appearance sample together when reviewing a delivery.
Look closely at veneer joints
Joined veneers have boundaries, and a change in grain at a sound boundary may be part of the chosen matching. An actual gap, overlap or ridge needs separate assessment. Mark the length and position of the affected line, photograph it with a scale and note whether it was present before finishing. Avoid describing every line as delamination: a face splice and separation between bonded layers are different conditions.
For a suspected overlap, do not sand until it disappears without checking the remaining face thickness. For an open seam, establish the substrate and bond condition before selecting a repair. The acceptable repair depends on the final appearance, exposure and agreed product requirement, not simply whether filler can cover the line.
Review light and dark bands in the intended lighting
A book-matched face can show alternating light and dark bands. Inspect it from different viewing directions with the intended finish. Distinguish a flat optical difference from a raised seam, blister or loss of adhesion.
If a uniform linear appearance is critical, resolve the matching and finishing approach through a trial panel before the order is processed. Reworking the stain on isolated strips can introduce a second colour problem without correcting the underlying reflection difference.
Record where and when fine splits appear
Face checks are fine splits in the veneer, often following its grain. Record their distribution, timing and whether they became visible before or after coating or installation. Note local heating, storage and any abrupt change in conditions. A cracked coating with intact wood is a different observation from a split extending into the veneer.
US Forest Service guidance on drying and dimensional change provides the moisture-control background. The cause of a particular check still needs investigation: face preparation, material condition, bonding and the finish may all be relevant. Neither a thicker panel nor a clear coating is a universal cure. Compare retained unprocessed samples with affected finished pieces where available.
Use each visible mark to guide the next check
| Observation | Record or inspect | Avoid assuming |
|---|---|---|
| Colour change at a leaf boundary | Matching, viewing direction and finished reference | Every colour change is a glue failure |
| Open line or raised overlap | Joint profile, extent and remaining face thickness | Heavy sanding will safely correct it |
| Pale or glossy patch after staining | Surface preparation and adhesive or coating history | Every patch is natural sapwood |
| Fine splits along the grain | Wood versus coating, timing and exposure history | Checking is unavoidable in every veneered panel |
| Blister or lifting edge | Bonded layers, affected area and process records | A decorative topcoat restores the bond |
| Pattern visible beneath the face | Substrate flatness, debris and veneer thickness | More stain will hide surface distortion |
Check stain patches and surface show-through
Surface adhesive contamination or bleed-through can affect staining. Follow the actual veneer and adhesive system’s instructions, and check the completed finish on a representative assembly.
Show-through can also involve surface unevenness, debris or underlying construction. Record whether the mark can be felt and whether it repeats across multiple panels. Review substrate preparation and the trial layup. Additional sanding may expose the substrate before a deeper irregularity is removed.
Set lifting veneer aside for assessment
Set aside a panel with visible blisters, lifting edges or separation for assessment before machining it into parts. Record the panel identity, affected area and processing stage. AWI's panel-material requirements distinguish unacceptable surface distortions such as blistering and ridges from decorative characteristics. Use the agreed order specification to decide acceptance for the supplied panels.
A coating cannot substitute for a sound bond. If testing is necessary, agree the sampling and method with the supplier or laboratory. A casual tap test alone does not establish the extent or cause of separation, and an improvised water test does not reproduce a specified bond test.
Plan a repair around the remaining face thickness
Identify the veneer thickness remaining after manufacture and any previous sanding. Sand-through changes the visible face and usually cannot be corrected by adding more stain. A small coating mark, damaged veneer and failed bond require different repair routes. Trial any agreed repair on a representative piece and compare it under the intended light after curing.
Keep the repaired part's location in mind: a patch hidden inside a cabinet and one at eye level on a continuous wall have different appearance consequences. Record any agreed change to use or appearance before fabrication continues.
Share your appearance reference or inspection photos
Send the order reference, panel identifiers, affected quantity, overall and close photographs, measured locations and the processing history through our enquiry form. Include the approved sample and relevant requirement. For a new order, start with a photo or preferred grain and use our decorative-panel approval guide to develop the face, edge and finish sample. We help choose from our decorative plywood range and plan matching or custom parts around that reference.
Veneer panel quality buying questions
What sample helps me agree veneer plywood quality?
Use a representative finished sample showing the colour range, a veneer joint, a cut edge and the intended coating. Review adjacent faces together when matching matters.
What should I send if a veneer surface looks wrong?
Send the order reference, overall and close photos, affected quantity and processing history, together with the approved sample reference. Keep the affected parts aside while the cause is assessed.